Elite Steel
How to integrate stainless steel in home design is less about adding a shiny surface everywhere and more about choosing where it earns its place. A brushed-steel backsplash can reflect light beside a kitchen window, while a slim range hood gives the room a clear focal point. Cabinet pulls, faucet fittings, and shelf brackets offer smaller ways to repeat the material. Small details matter. Mies van der Rohe’s well-known principle, “less is more,” offers a useful lens: use stainless steel with restraint, then let its clean lines support the rest of the room.
Finish and placement shape the result. Brushed or satin surfaces usually soften reflections, while polished steel creates a brighter, more noticeable effect. In a family kitchen, stainless steel can pair with warm oak, textured stone, or matte cabinetry to reduce a clinical feel. It is practical, but not effortless. Fingerprints and water marks can show, especially on polished surfaces, and harsh cleaning tools may leave scratches. Choose products suited to the room, check care instructions, and test samples under your own lighting before committing. Not everywhere. A single well-chosen surface may feel more balanced than matching every fixture. This guide explores finishes, room-by-room applications, color pairings, maintenance, and common design missteps. It also leaves room for personal judgment: a combination that looks calm in a showroom may feel cold at home. That is worth considering.
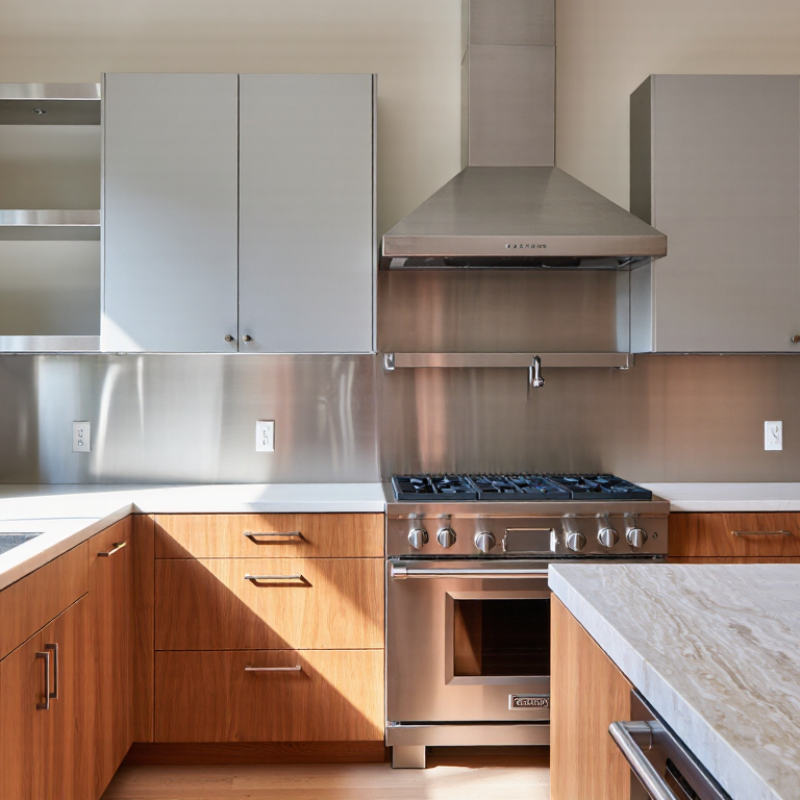
Stainless steel brings a clear, practical character to home interiors. Its smooth surface reflects light, which can make a compact kitchen feel brighter. It also resists rust and staining, but performance depends on the steel grade, finish, and care. It is not magic. Salt, harsh cleaners, and standing moisture can still mark some surfaces.
Its design role goes beyond appliances. A brushed-steel backsplash can sit quietly beside painted cabinets, while a slim countertop edge adds a crisp line without overwhelming the room. Steel handles and tapware offer smaller accents. These details work well with wood, stone, and warm lighting, which soften the material’s cooler appearance.
Fingerprints show easily on polished finishes, and scratches may become visible over time. That can be frustrating. A brushed texture often hides daily marks better, though it is not entirely forgiving. Magnetic properties also vary by steel type, so check before choosing magnetic accessories.
Tips: Match the finish to how the room is used. Choose brushed steel for busy touchpoints, wipe spills promptly, and use a soft cloth with mild soap. Test cleaners on a hidden spot first. Small samples help; room lighting can change how the finish looks.
Stainless steel works best where durability and easy cleaning matter, rather than as a finish applied everywhere. In a kitchen, consider it for a backsplash behind the hob, a sink, or a narrow worktop beside the cooker. These areas handle splashes, heat, and frequent wiping. It also reflects light, which can brighten a shaded corner, though broad polished panels may feel cold.
Use it sparingly. A brushed finish can soften reflections and disguise small marks better than a mirror-like surface. Keep fingerprints in mind, especially on cabinet fronts near handles. The surface needs regular wiping. That matters. Pair steel with warm wood, textured tile, or painted cabinets to balance its crisp appearance. A small steel shelf or range hood can repeat the material without making the room feel commercial.
Bathrooms offer another practical place: try a steel towel rail, shelf, or cabinet pull near the basin. Check that the chosen product is suitable for damp conditions, since finishes and maintenance needs vary. In a living room, a slim table leg or lamp base adds a subtle metallic note. A common misstep is repeating steel on every visible surface; the result can feel stark, even when each item is well made. Test samples beside your flooring and wall color in daylight, then again under evening lighting. The change can be surprising.
When choosing a stainless-steel finish, consider how light moves through the room. Brushed steel softens reflections and usually disguises small marks better than a mirror polish. Polished steel feels brighter, but it can show fingerprints and nearby clutter. A satin finish offers a quieter middle ground. Small samples help. View them beside your cabinets in morning and evening light; color can shift more than expected.
Pair steel with materials that add warmth or texture. Oak, walnut, and other woods soften its cool appearance, while linen shades or woven stools make a kitchen feel less clinical. Pale stone creates a calm, airy look; darker stone gives steel a sharper contrast. Keep undertones in mind: a yellow-toned wood may clash with a very blue-looking steel surface. That matters.
I have to admit, matching every metal finish can make a room feel overly planned. A little variation often looks more natural, though it needs a clear anchor. Try repeating stainless steel in two or three places, such as cabinet pulls, a faucet, and an appliance, then let other details differ. Not every contrast works. A glossy steel panel beside highly polished stone can feel busy, especially under strong task lighting. In that spot, a matte backsplash or textured timber shelf may give the eye somewhere to rest.
Stainless steel is easiest to integrate when its location and fixing method are decided before cabinets or wall panels are ordered. Measure the finished opening, not just the rough framing, and note outlets, taps, and changes in wall depth. A cardboard template can reveal awkward corners that a tape measure misses. Check that the supporting surface is flat and strong enough for the panel and its hardware.
Plan the edges as carefully as the visible face. Folded or hemmed edges feel more finished and reduce exposure to sharp sheet edges. At corners, specify a small radius or a neat folded return; perfectly sharp corners can catch cloths and fingers. Leave a discreet movement gap where the panel meets adjoining materials, then cover it with suitable trim or a compatible sealant. A tight fit looks tidy on paper, but it may leave little room for movement or adjustment.
Choose fasteners and brackets that suit the steel and the conditions around it. Concealed clips can keep a backsplash uncluttered, while accessible screws may make future removal easier. Avoid pairing dissimilar metals without checking compatibility, especially in damp areas. Set out holes before drilling, and confirm their positions against the actual fixtures. Small errors show. I would still inspect the edges in daylight before final fixing; workshop lighting can hide scratches and uneven gaps.
Planning sheet thickness for panels, edges, and hardware
Common sheet-metal thicknesses are shown in millimeters. Thicker sheet is generally more rigid, while thinner sheet is lighter and may need closer support. Gauge-to-thickness values can vary by specification and supplier; confirm the material and fabrication details before planning edges, fixing points, or hardware.
Stainless steel suits kitchens, bathrooms, and entryways, but its finish needs steady care. Fingerprints, cooking oils, and hard-water spots show quickly on brushed surfaces. They are not signs of failure. Most marks lift with warm water, mild dish soap, and a soft microfiber cloth. Wipe along the visible grain, then dry the surface to limit streaks and mineral deposits. For stubborn residue, repeat the gentle wash rather than scrubbing harder. Small habits matter.
Avoid chlorine bleach, steel wool, and gritty scouring pads. They can damage the protective surface or leave particles that later rust. This matters near sinks, cooktops, and windows, where moisture and salt may collect. If a cleaner is unfamiliar, test it on a hidden area and follow its label. It is tempting to grab a rough pad when a mark resists, but impatience can leave a more noticeable blemish. Check seams, handles, and undersides occasionally; grime gathers there before it becomes obvious. For brushed finishes, avoid circular polishing, which can leave visible swirls.
Brushed steel often hides fingerprints and daily marks better than polished steel. Not completely, though.
It resists rust and staining, but results depend on the grade, finish, and care. Salt and standing moisture can still leave marks.
Use warm water, mild dish soap, and a soft microfiber cloth. Wipe with the grain, then dry the surface.
Avoid bleach, steel wool, and gritty pads. They may damage the surface or leave particles that rust later.
Measure the finished opening and note outlets, taps, and wall-depth changes. A cardboard template can catch awkward corners.
Folded or hemmed edges feel finished and reduce exposure to sharp sheet edges. Leave a small movement gap near adjoining materials.
Concealed clips can keep the surface uncluttered. Accessible screws may make future removal easier.
No. Magnetic properties vary by steel type, so check before buying magnetic accessories. A small test can prevent disappointment.
This guide explains how to integrate stainless steel in home design by considering both its practical qualities and visual impact. Durable, moisture-resistant, and easy to clean, stainless steel can suit kitchens, bathrooms, utility areas, and selected living spaces. Use it for countertops, backsplashes, sinks, cabinet details, shelving, or hardware, choosing locations where its strength and reflective surface support everyday use. Thoughtful placement helps the material feel intentional rather than overwhelming.
Finish and material choices shape the overall effect: brushed surfaces can soften reflections, while polished steel creates a brighter, more contemporary look. Pair it with wood, stone, tile, or other textures to add warmth and contrast. During installation, plan for secure support, clean transitions, smooth edges, and compatible hardware. Regular cleaning with a soft cloth and suitable gentle products helps preserve the surface and maintain its appearance over time.